Logging time
Every work item gets a Time Log tab.
Record what you spent — hours and minutes, the date, the type of work it was, and a comment — and the work item’s Completed and Remaining fields move with it. There is no second place to update and nothing to reconcile later, so what Azure DevOps reports stays in step with what the team actually did.
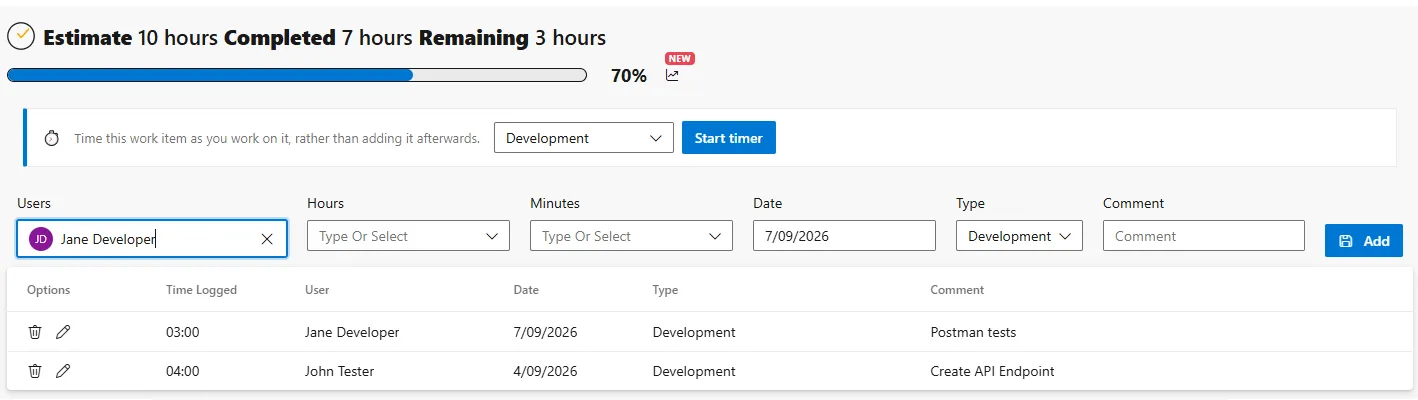
Everything already logged against the item is listed underneath, so an earlier entry can be corrected or removed without leaving the work item. Time can be logged on behalf of other team members too, where your administrator allows it — useful for recording a workshop or a pairing session in one go.
See where the time went
Section titled “See where the time went”The bar at the top of the tab says how far through its estimate a work item is. It does not say where that time went; the chart button beside it does. Time breakdown answers that without making you read the entry table row by row.
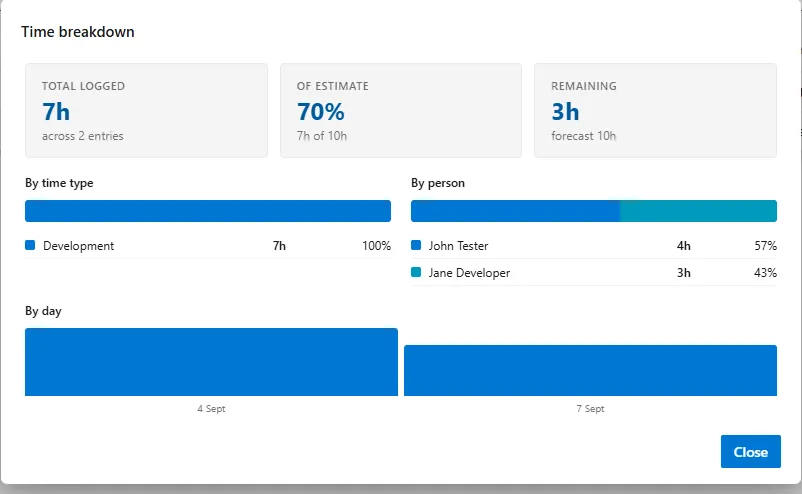
Three figures sit across the top: total logged with the number of entries behind it, of estimate — how much of the original estimate that represents — and remaining, with the forecast total it implies. Below them the same time is broken down three ways:
- By time type — whether an item went mostly on development or mostly on rework.
- By person — whether it was one person’s work or the team’s.
- By day — the fourteen most recent days that have time against them. Only days actually worked are shown, so an item picked up months after it was last touched does not render as a row of empty columns.
The first two show a stacked bar over a table of hours and share of the total. Colours match the Analytics Dashboard, so a time type reads the same in both.
The button appears only once there is time logged, so it never opens onto an empty dialog, and it reuses the entries the tab has already loaded — the breakdown costs no extra requests and needs no new permissions.
Start and stop a timer
Section titled “Start and stop a timer”Time can be recorded as it is spent, rather than remembered at the end of the day. A timer sits at the top of each work item’s Time Log tab: start it when you pick the work up, and stopping it logs the time. The timer already knows the work item, the type, the day and the duration, so there is nothing left to fill in. The same timer appears on My Time Log, where a ▶ in any of today’s cells starts one and a bar above the grid shows what is running, how long for, and when it started.
Only one timer runs per user at a time. Starting a second asks first, and by default logs the running one’s time against its own work item before the new one begins, so nothing is thrown away by accident. Where a project offers a single time type there is nothing to choose, so the timer starts on the click instead of opening a picker.
The timer lives against your Azure DevOps account rather than in the browser. It survives a reload, follows you between machines, and reads the same in both places. A timer running on a different work item is drawn differently from one running on the item in front of you, and captioned with the work item it belongs to, so its elapsed time cannot be mistaken for time accrued here. One left running for more than twelve hours is flagged rather than stopped for you.
What happens when you stop depends on where you are. On My Time Log the Add Time Log dialog always opens, pre-filled with the elapsed time and the type it was started with, because the work item being timed may not be one on screen. On the work item’s own tab the time is recorded directly — unless Minimum comment length is set, in which case the dialog opens there too, ready for the comment your organisation requires. Cancelling it leaves the timer running rather than losing the time.
A timed entry is an ordinary entry: the lock date, the ban on logging to closed items and the rule on future dates all apply, and Completed and Remaining update exactly as they do for one typed in by hand.
The timer is off until an administrator turns it on — see Enable the time log timer.